
Wordless Wednesday
Wedded Bliss. A Project by Sundown Gardens.
A client calls in says their daughter is getting married at their home “in 3 weeks” and would like to know if we can come by and spruce things up a bit. Truth be told, the client wanted little more than this, but I proposed (no pun intended) more. And they went for it!
I think “my thing” at work has become “making it happen.” Consequently, I’m called in to whip things up in situations like these. Sure there are moments of panic, like when you think the project is dead, then you get the call saying please proceed– a week later!! Then there are those moments when you need 70 white mums in fall but all the growers are out of white and nearly every other color for that matter. This is when I dig down deep inside and remind myself to breathe. Then I formulate plan B, and C, but never lose hope for A.
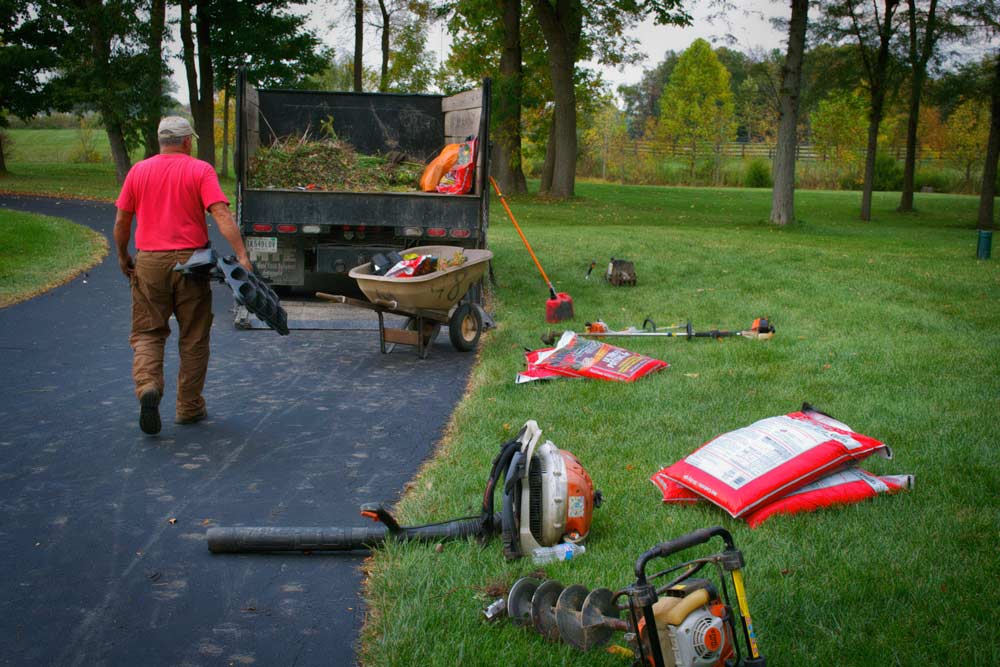
Our job begins with a fall cleanup, which consists of weeding, removing or cutting back spent plant material, pruning (where necessary), mulching, and of course hauling away all the debris. Not shown, myself and 3 other team members furiously working away.
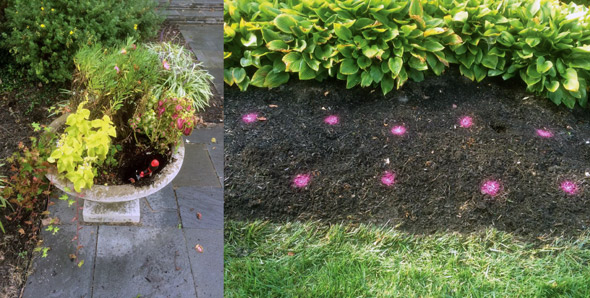
While the cleanup is in progress, I undo the urns where old summer annuals were past their prime. The pink dots mark where new mums will be planted. It’s rainy, but the show must go on. The wedding is in 4 days.
As I planned for this transformation, I kept hearing in my head “Something old, something new. Something borrowed, something blue”. The symbolism of this Old English rhyme became integral to my plan.
To enhance the fall theme, mini Cabbages and Heuchera with Swiss Chards were added as foliage accents. Grasses and Variegated Liriope echo the existing Liripoe in the beds. A cute pumpkin tucked here and there reminds us that this is the gathering season.
I was surprised to find two tall plastic pots deep in the garden beds. Except for one white geranium, all was practically dead in the neglected pots. This became my “something borrowed” moment. I gathered the old Geraniums and silvery Dusty Miller plants from another container and planted them together with new cabbages and kales. I just love how this came together.
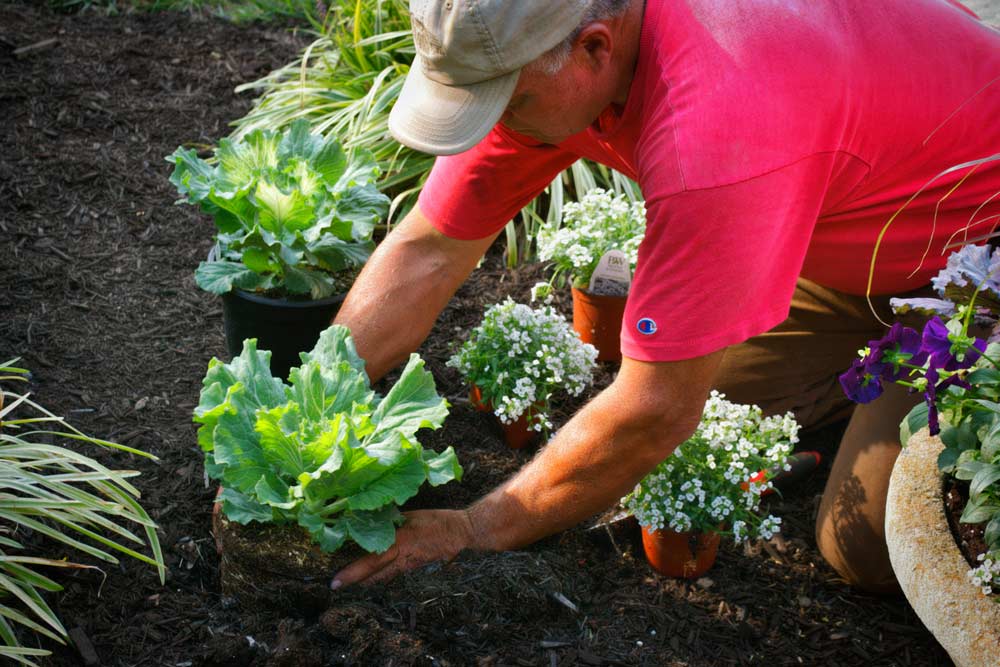
The edges of the beds near the walkway were also planted with Cabbages and Sweet Alyssum. Repeating plants in various areas formulates visual cohesion and that creates a calming effect for the eye.
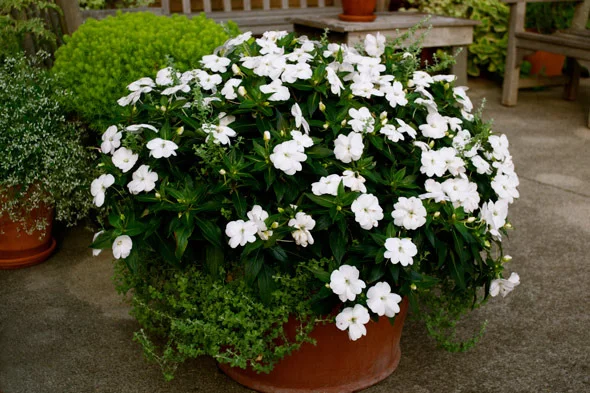
This is the view from the front porch. One side of the walkway was planted in a mass of pansies. This was my “something blue”. The enormous mum pots with grasses in the center reach 4 1/2 feet tall and are wonderfully impactful. Just cracking open, these four pots will bloom in white. Eight other matching mum pots in every color but white are placed throughout the outdoor reception area.
And last but not least, “something new”. The home is flanked by 70 mums in white. This is a wedding afterall. As luck would have it, I was able to procure the mums at the perfect bloom stage– 4 days till showtime. I just love how they look against the golden hues of the hostas. I love pulling it all together and seeing it come to fruition.
Some projects are a year in the making, others just a few days. No matter the timeline, I strive to give all projects, and clients, my very best. Oh, about that swanky car. It’s a vintage Cadillac which will be used for photo ops at the wedding.
Seeing Red. (My comeback post)

Eddie Lee May, 1941-2014. This post is dedicated to Lee May, author of Lee May’s Gardening Life blog. In my life, Lee was a blogging buddy, writing mentor, and fearless gardener. I was never so proud as when I appeared on his blogroll. He is greatly missed.
I once read that one was never to use red in the landscape because it interrupted the visual flow too much. For that reason, I’ve refused red blooms for years and still observe this rule today. That goes for annuals too- not in my pots. It is indeed a powerful color which has an interesting set of associations –heated emotions, passion, violence, communism, a sign of warning (traffic lights etc), and of course blood. I’m just not a fan, but admittedly have purchased a few red geraniums in my day. Other than that, I easily ignore the other red flowers at the garden centers… until this year.
My personal container designs have become a testing and trial exercise on how to exploit the virtues of a particular color. For several years, I have chosen a specific color theme to adhere to. The intent of this self-imposed constraint is to force myself to use new colors and new plants that would otherwise go ignored due to my finicky color prejudices which I developed some time ago. New plants mean new plant combinations, and new combinations mean better design savvy (hopefully). So this is where my stance on red takes a turn. This year I would work in red.

It took a while to amass enough plant material to begin. Many of the reds are just too fiery and off-putting. If I were to commit to red, it would have to meet me half way. I needed lovely sumptuous reds that would pull you in instead of agitate the eye and make you want to look away. I’m pleased with most of the results. Would I ever enter the red zone again? Not by choice, but the point of my exercise is simply to expand my knowledge of plants and use of color. Armed with this year’s experience, I’m confident I can create something beautiful with reds if I am ever called upon to do so. As I reflect on the past year, I am reminded that life is short. Try everything. Even red.
Please enjoy this visual survey and notes from my containers. Hover over the bottom left of an image to reveal my notes.


Spring's Rollercoaster Ride
 I’m back after a little break from posting to Hortus 5. Truth is, I’ve been savoring winter’s slow motion and luxuriating in its quite stillness. Now Spring is finally here and the last couple of days have been damp and chilly. Inbetween sunrise and sunset, one can still see their breath. I think most everyone in the Midwest is yearning for a warm and sunny Spring. No such luck, yet.
As winter loosens its grip, I am once again experiencing the multiple forces of the season which tend to make me more frustrated than anything. Exciting as it may be, I also find it a bit torturous. Spring’s hills and valleys are much like a rollercoaster’s, constantly changing, pulling you in all directions. Cold one day, wet another. And what to wear– base layer, rain coat, or both? My inertia climbs toward the sunny peak but Spring’s coaster car has other ideas. Down we go again. Let’s hope this ride doesn’t plunge through a frosty tunnel or two. Ready or not, Spring is here and as always, it’s gonna be a scenic and bumpy ride.
Above: Magnolia buds trying to break open.
Sneak Preview: Piet Oudolf Documentary
I’ve been following the work of Piet Oudolf for some time now. He has been called the master of site-specific design in the contemporary naturalistic planting style. Although I’ve only seen his work in photographs, the scale and scope is awesome, thoughtful, and to me, inspiring. I’m so excited to share this preview of a piece being done to feature and document his work and process.
There has been much dialogue and debate as to whether or not this style of naturalistic planting design will take root here in the US, and to what degree. Reserved for public spaces? Will it creep into mainstream residential design? Time will tell, but this I know for sure. Mr. Oudolf’s body of work is and will continue to be looked upon for generations to come as an artistic triumph of self-expression in planting design.
Oh my stars!

Corydalis temulifolia ‘Chocolate stars’
Gardens Illustrated magazine describes it this way: “Wonderful crinkle-edged, rust-coloured foliage in winter becomes almost orange in March. By April, lavender flowers deck the now bronze leaves. The whole plant gradually fades to olive green by June and sits unobtrusively in the garden until November when the first frost knocks back the green leaves and reveals the new rusty leaves emerging from below. It is a sight for sore eyes in February.”
I think that sounds just divine.
Image Source: John Grimshaw’s Garden Diary
Rehab for a Gardener?
 “In January the most important thing a gardener can cultivate is themself.” So says Jojo Tulloh in the Gardens Illustrated articled titled Respect Yourself. I couldn’t agree more and liken it to nursing a nasty hangover after binging on gardening for months on end. I do my best to sleep it off and find that a little ibuprofen helps too. But what’s the use? It won’t be long before I fall off the wagon again. I always do.
Debauchery lies ahead, beneath the current pages of the calendar. Soon I’ll be drunk again with flowers and foliage. Is rehab in order? I don’t think so. I just need some time to rest, to plan, and even dream a little. Perhaps I’ll set a goal or challenge of learning a new skill over the coming party *ahem* growing season. The next drunken stupor is inevitable, but it’ll will have to wait at least until March.
No one says it better than the late Amy Winehouse (below). Happy New Year!
Too late to plant bulbs? We shall see.

I’ve been bad. I was given some bulbs this past autumn but for one reason or another, never got them in the ground. The ideal time to plant bulbs is about six weeks before the ground freezes in your area. This gives the bulbs time to root and establish themselves. We’ve already experienced one ground freeze about four weeks ago. Recently the snow melted and temps were in the 50s. I got busy and buried 75 tulip bulbs before the predicted rains began. But am I too late?
I’ve seen gardeners plant daffodils in the snow and they were beautiful the following spring. Below left: An images from a Master Gardener project I documented. The gardeners were planting daffodil bulbs in January snow. Below right: Great results despite the late planting.

This is my first time ever planting bulbs. It’s easy, but tedious if you have several bulbs to plant. It’s the digging that gets you. I don’t own one of those fancy bulb dibbles. I did all my digging with a trowel and fortunately have nice tillable soil to work with.
So, what is the best time to plant bulbs?
When the average nighttime temperature in your area is 40-to 50-degree range. For northern climates, plant in September or October, in warmer climates, you may need to plant in December or later.
If you plant too early, they might come up before the weather gets colds then die once frost comes. Planting too early can also lead to fungus or disease problems.
What if you miss the ideal time?
Let’s be honest. This happens, but don’t wait for spring or the next fall because bulbs do not survive above the ground indefinitely. If you find that you have bulbs that need to get in the ground, take your chances by planting them as soon as you can.
Here’s how I did it:

Step 1: I arranged the bulbs where I wanted them above ground. This helped me visualize the spacing and layout. Hard as you may try, it’s difficult to remember your layout once they’re underground. That’s why you start with everything layed out above ground.

Step 2: One by one, I dug a hole for each bulb. All bulbs should come with specific planting instructions. Generally speaking, tulip bulb holes should be 8 inches deep. Refer to the chart below for other bulb depth guidelines. Some bulbs will look nice planted in clumps rather than individually.


Step 3: With the hole prepared, I placed the bulb in the hole with the pointy-side up. I gently pressed the bulb into the bottom of the hole just to ensure that it did not roll or tip over.

Step 4: Next, I gently sprinkled soil back in the hole being careful not let the bulb tip over as I filled in the soil. Once covered, I patted it down with my hands.

Step 5: You can lightly water the bulbs after planting to help begin the process of growing, but do not soak them or they may decay and die. I did not water as the soil was moist and rain was predicted for later that day.
So now I wait. The bulbs will lie dormant for the remainder of winter. I think it’s gonna work despite my procrastination. I did not add any bulb food or fertilizer as I figured these bulbs were already well fed and programmed for next spring. Hey, they’re lucky they even got in the ground!! Stay tuned for a progress report.
Wordless Wednesday

Hardscape Maintenance With Polymeric Sand

I know, I know. I should be posting about winter interest in the garden and feeling warm and fuzzy about the holidays, but I’m still in work mode. Warm and fuzzy will have to wait. Today, I’m writing about an important task that I recently completed which focused on the hardscape instead of the landscape. Years ago, I had a limestone sidewalk installed, and while the stone is in great shape (developing a lovely patina) the joints between the stones needed some upkeep. I added Polymeric Sand to the joints- a task I find myself doing at least every other season. And while it’s not difficult, this job has many steps.
What is Polymeric Sand? Before we get into the project details, I would like to take a moment to explain what Polymeric Sand is (sometimes referred to as Polymeric Joint Sand) and why it is beneficial to hardscapes comprised of concrete pavers, cast stone, pavements, slabs, and natural stone products.

Polymeric Sand is a fine sand with additives, such as silica and polymers which form a binding agent with the introduction of water. The binding agents lock the individual sand particles together, which in turn form a solid yet flexible bond between joints of pavers or slabs.
Benefits of Polymeric Sand. First, you get improved durability. The binding agent increases the strength of the walkway or patio. The binders allow less water into the gaps and that helps keep your foundation more sturdy.
Ordinary sand can quickly wash out or splash out with heavy rains. Loose sand also sticks to shoes and bare feet which can be tracked into your house. This is reduced tremendously with Polymeric Sand.
As gardeners, we know weeds can grow anywhere. They will grow prolifically in sand, but not so much in Polymeric Sand. We do enough weeding in our beds, we don’t need to be doing it in our hardscapes.
Ants have a difficult time making homes (or cities) within the Polymeric Sand joints. Another bonus in my opinion since ant colonies can loosen and shift regular sand with little effort.
Project Description: Readjust stones as needed and refresh joints with new Polymeric Sand.


This front walkway is made of Indiana Limestone. Over the past few years, the elements have shifted a few of the stones pieces and some the joints needed refilled. I decided to remove all the old stuff and add new. Some of the joints were ok while others were in desperate need refilling. Above: Over time, movement has occurred which is reflected in the uneven spacing between the joints. The gentle arc on the outside edge is now an eye sore due to the shifting.

I carefully loosened and pushed out the older material with a screwdriver- being careful not to scratch the stone surface. To my surprise, much of the old Poly was still holding together well. You can see the binding agents still at work in the pieces I lifted out. Above: Notice the grass beginning to grow in the joint (upper right) where the old Poly Sand has eroded. Over time the joint has collect soil and debris making it possible for weeds and grass to germinate.

I ran a shop vac over all the joints to get as much loose sand and debris out of the joints.
Next I carefully lifted and repositioned a few of the stones which had moved out of alignment. This takes time and patience! Large stones require many subtle adjustments to keep them level with the other pieces.


With the stones repositioned and the joints empty, it’s time to add the new Poly Sand. Simply open the bag and spread the sand evenly over the surface. Use a push broom to sweep it in until it’s at the proper depth below the top surface. The depth will vary according the brand of sand you use. It will expand (rise up) when it comes in contact with the water.
Remove as much of the extra product from the surface once the joints are adequately filled. I used a broom and gently blew off excess with a hand held leaf blower.

Next, use a spray nozzle attached to a garden hose on the “shower” setting to begin adding water. Take care to not wash out any sand. Let the water gently soak into the joints. Follow the rate and rest period for water application as noted on the product’s instructions. This is not the time to grab a beer or chat with the neighbor. Stay on task so the product sets up properly.
Last, sweep and or blow any excess water and sand off the surface to avoid any adherence or discoloration to the stones or pavers.

And that’s that. Whether you have concrete pavers, retaining walls or natural stone they will all require some maintenance in order to keep them looking their best. Polymeric Sand installation to fill joints and restabalize your pavers is an easy DIY project. Always read and follow the instructions on the package of the product you use.
Final notes. Don’t rush any of the steps. If you’re adding Polymeric Sand to a new project, you’ll most likely need a heavy duty tamper to settle it into the joints. This is not as necessary for reapplying to an existing area. Polymeric Sand is available in different colors.
I used PolySweep by SEK and purchased it at an architectural and landscape stone center. There are many brands available, but like anything, you get what you pay for. For best results, try to get a professional grade product from a specialty outlet.
Wordless Wednesday

Falling Into Place
 Foreground; Acer palmatum Tamukeyama
It’s been a rainy day– so much so that Halloween activities were rescheduled to Nov. 1 due to the predicted downpours and wind gusts. As I stepped outdoors on Halloween morning, it was already wet and windy, but autumn’s brilliance still shown through the dark skies.
Two years in, the new tree additions in the back yard are beginning to make their presence known. No more is this true than in autumn. Shades of gold, red, purple, and orange are just what this otherwise barren landscape needed. Don’t get me wrong. I love all the green shades that spring and summer provide, but when autumn arrives, I crave fall color.

Some of the new additions are still staked, while others grow within low cages designed to keep out bark-nibbling critters. There’s plenty of room for more, but it’s hard to choose what should be planted next. So for now, I’ll just enjoy the burst of color and admire how it’s all falling into place.
Cutting Back Perennials for Winter

While I was preparing to write this post, an email popped into my inbox from Bluestone Perennials with autumn tips for cutting back perennials- the very subject I was going to tackle. Bluestone Perennials is a family owned and operated mail order/online store based in Northeast Ohio. They carry wonderful perennials, shrubs, grasses, and groundcovers. I rarely order plants online, but when I do, it’s from Bluestone. Check out their tips for cutting back your perennial beds. I couldn’t have written this information better myself. Thank you Bluestone!
Cutting Your Garden Back for Winter
Leaves beginning to fall signal that it’s time to get your garden ready for its winter nap. Most of your perennials will die back to the ground (herbaceous plants). They will overwinter at or below the soil line, so you’ll want to get rid of the old foliage to make way for the new growth come spring.
The number one nemesis to perennials is being smothered over the winter and rotting. You’ll want to get the old spent foliage out of the way, and remove any reason for autumn’s leaves to drift in and be trapped around the base of your plants. Here are a few things to consider:
• Look around and see if any flowers would add winter interest to your garden, like upright Sedum, Baptisia, Ornamental Grasses, Achillea and Astilbe. If you like their look, just wait and cut them back in the spring. It is also a good time to make wonderful dried bouquets for indoors – and they will last all winter!
• In most cases you’ll be cutting back the plants to 4-6” in height. In a windswept spot you can leave them taller to help trap insulating snow.
• You don’t want to cut back plants that regenerate on last year’s growth, like shrubs and evergreen plants. There are some woody perennials that fall into that category too, like Perovskia, Lavender, and Iberis.
• You’ll find gloves, hand pruners and hedge shears handy to have. As you cut down the spent foliage be careful not to crack or split into the crown of the plant. A lot of flower stems are very brittle and will snap right off, but if they are woody like an Echinacea, you’ll need to snip them back to prevent accidental damage. If in doubt, grab your shears and have at it.
• This is also a good time to pull out any dead annuals from the border so there is no question in the spring whether a dead looking clump is really dead or is actually a valuable perennial, not yet awake. Most perennials will show signs of life at the crown early in the spring, and with the annual tops gone the fall before, spring cleanup can be delayed quite a while. No plants need to be lost to an overzealous worker!
Once your garden is cut back, most leaves will blow in and back out of your borders. On one of the last days before winter tightens her grip do one final quick rake to remove any leaves that stuck around. Then put away your tools and start daydreaming of spring.
Happy Gardening!
William Boonstra, Second Generation Owner & Grower
Saying Goodbye to Summer Annuals
It’s time to say goodbye to my summer annuals despite the temperate weather. In central Indiana, weather turns on a dime and procrastinating will only lead to a very chilly or wet time-consuming task. It’s hard to say goodbye after all the hard work that has gone into designing and caring for the containers. On a recent Sunday morning, I took a close look at the patio containers near the pool deck. I thought it would be fun to build the composition through video. So many times, I photograph individual pots and details never giving a sense of scale or composition. Though my video techniques are lacking finesse, I think you’ll get the idea of what the small poolside patio was like this season.
Click on the thumbnails below to find out more details. I’m starting to document my work with annuals more closely so I can reference the silhouettes and plant growing habits for future projects. Up to now, annuals were not a big deal to me, but as my role at the garden center advances, I am beginning to understand and appreciate their function in the landscape a bit more.
Question: Do annuals play a big role in your garden?


Purple Petticoats at the Junction
Remember that? I was too young to comprehend what this show was about when I watched it as a child. But that catchy theme song and opening footage? I’ll never forget! It’s what I’m reminded of every time I mention a favorite Heuchera of mine- ‘Purple Petticoats’.
I stumbled across this plant last year– a remnant of a promo we did at Sundown Gardens earlier that season. By September, four quart-sized plants remained unnoticed by customers seduced by more ample gallon-sized containers. Tending to them day after day, I noticed the subtle color changes throughout the season. The foliage was fancier than the other Heucheras and I became a bit obsessed with them. I took them home and planted them about this same time last year. Still in a tight grip of a horrible drought, I had little hope they would make it, but almost as soon as I planted them, they began to thrive. By late autumn the coloration had intensified and the foliage had become a lovely deep purple.

So, I guess I have a little Petticoat Junction of my own now. It’s on the sunnier side of the tracks, just beyond the “Shady Rest Hotel” where the edge of the shade garden meets the full sun area. ‘Purple Petticoats’ resides in the sun area. Yes, I said sun. Recent breeding trials with the native species Heuchera villosa have created plants that are able to tolerate more heat and humidity. In addition, they have increased sun tolerance and many do quite well in full sun situations. Hail to the V!
Please enjoy some images from the Junction. Note the color differences throughout the season. For an encore, I’ve attached a little real-time video. The backlight effect is caused by sun shining through a neighboring tree’s leaves.
 May 6. Deep purple foliage.
 May 31. Green tones emerge as temperatures rise.
 August 1. Green hues shift to red before returning to purple in autumn. The underside of the leaf remains bright purple.
Other Heuchera villosa hybrids include: ‘Caramel’, ‘Circus’, ‘Brownies’, ‘Citronelle’, ‘Autumn Leaves’, ‘Pistache’, ‘Tiramasu’, and ‘Frosted Violet’.
Classic Annuals, Surprising Foliage Accents

It’s been quite some time since my last post. I’m still here. Just tired, and on plant overload, the side effect of working at a garden center and nursery. I’d like to say that working in the nursery business has changed my gardening perspective, but it hasn’t really. Perhaps it’s a bit more refined though. No matter what new plants or colors come in, I’m still attracted to the classics, or good ‘ole standbys if you will. This goes for annuals too.
When I started working at Sundown Gardens, I was giddy with excitement about all the annuals I would have at my disposal for my own containers. Little did I know that customers would show up to the store with their empty containers in tow wanting custom potting jobs. I never expected that it would become part of my job(s) either. The orders span the gamut. Some containers are manageable, others require a big truck and crew to deliver and place on site. I love doing it, but even with an overabundance of annuals and perennials to choose from, it’s never easy. I try very hard to create something unique for each customer. I often wonder how those designs hold up after they’ve gone home to their rightful owners.
Speaking of home, this potting business has given me cause to scrutinize my own container designs more carefully. The patio and front porch have become a laboratory or sorts, where I experiment with foliage and bloom combinations and put light levels to the test. There are so many choices to pick from that I impose constraints to keep myself in check. This season, I chose the color white for all the pots near the pool. In the end, I weave many of the classics into the mix. If you can master composition with these, then everything else is icing on the cake. In years past, I have relied heavily on coleus. This year I used none. I traded them in for Scented Geranium, Licorice Plants, Alocasia, Abutilon, and Plectranthus. For blooms, I am relying heavily on Mandavilla Vine, Calibrachoa, Dahlias and of course, Marigolds (Vanilla Marigold shown above). Here’s a peak at my palette this year with an emphasis on the foliage accents.
Abutilon savitzii

I love the maple-leaf shaped foliage with creamy white edges of this Abutilon. I keep the moisture level of this plant very consistent. It receives direct sun in the morning hours and is completely shaded by noon. Many of my pots are not combos, but single plants nestled against other pots. This creates a more pronounced effect.
Nephrolepis exaltata Boston Fern ‘Tiger Fern’

I love Boston Ferns and forewent the classic solid green for a variegated variety call ‘Tiger Fern.’ Situated in bright shade, they receive no direct sunlight. Since they are in a shady area, its easy to keep the soil evenly moist. The chartruese highlights really brighten this otherwise dark spot.
Alocasia macrorrhiza ‘odora’

Commonly known as Elephant Ears, this tall tropical is the main attraction in a large pot. Positioned in the center, the large leaves are dramatic and arch out gracefully over the white Scavoila tutu that outlines the rim. Scale is so important when designing plantings. You can create instant drama by combining bold large plants against smaller delicate ones.
Coryline terminalis ‘Miss Andrea’

In shades of cream, purple, red and green, I found this Cordyline hard to resist. It has a nice relationship to the creamy shades of the other plants, yet refuses to completely blend in. You need at least one plant with this temperment in your collection.
Dahlia ‘XXL Mayo’
This is one of the bloomers set amongst the many accent plants. Extra extra large blooms and deep dark green foliage make this classic a showstopper. As its name suggests, the off white tone resembles the creamy condiment mayonnaise. This Dahlia receives direct sun till about 1PM. Very sturdy 24” tall stems. Has been blooming constantly since early May.
Pelargonium graveolens variegata ‘Mint Scented Rose Geranium’

Love this! A very textural plant that rarely blooms. I was lucky enough to see a few flowers earlier this season. The deeply cut leaves add much visual interest to my collection of plants. Scented geraniums were widely grown in the Victorian era and used for perfume and potpourri. They were occasionally used for cooking too. I’ve noticed scented/fragrant plants making a bit of a comeback.
Helichrysum petiolare Petite Licorice

I’m a big fan of licorice plants and found this silver petite variety very charming. I used it with bright white SunPatiens (the full sun version of Impatiens). Avoid overwatering licorice plants as it makes the foliage quite unattractive. Proven Winners offers a wide selection in a variety of colors.
Plectranthus aurea marginata

This is a beauty! Don’t let the delicate scalloped edges and velvety texture of this plant fool you. It’s as rugged as it is beautiful. I think it goes head-to-head with any coleus. My Plectranthus recieve sun till 1PM and shade the rest of the day. The chartreuse edges echo the Lemon Licorice hues from the neigboring pot. Very easy to grow.
Sun Parasol® White Mandevilla

A very common tropical sold all over the US in spring. I fell in love with the white one and made it the centerpiece of my annual container scheme. A true vine that will climb terllises or flow out of hanging baskets. The foliage is deep dark green and glossy. This plant (like most tropicals) requires regular watering and does not like to go dry. The intesity of the yellow center makes the white petals appear extremely bright white.
I hope everyone is enjoying their summer in the garden. I will post more on my annuals and container designs in future posts.
Garden Bloggers' Bloom Day - June 2013
June is a wonderful time at Sutherland. So many beautiful blooms and fragrances. This is indeed the month where working in the garden is such a pleasure. As I review the photos for this post, I can’t help but see a distinct color palette. I guess its just the designer in me. Here’s to a wonderful spring and an even better summer. Cheers.
Astilbe ‘Rhythm and Blues’

Azalea ‘Weston’s Pink and Sweet’

Gaura ‘Stratosphere Pink Picotee’

Heuchera ‘Circus’

Hosta ‘Blue River’

Moonlight Chinese Hydrangea Vine

Pink Annabelle Hydrangea ‘Bella Anna®’

Thalictrum inchangense ‘Evening Star’

Garden Bloggers’ Bloom Day is a Meme created by May Dreams Gardens. Gardeners post images of what’s blooming in their garden on the 15th day of every month. All are welcome to participate.
It's here- the book giveaway. comment for a chance to win.

Please enjoy an except from Thomas Mickey’s new book titled America’s Romance with the English Garden. You could win a copy by simply leaving a comment in the comments sections of this post.
About the book
The book tells the story of how late nineteenth century mass-produced garden catalogs and national garden advertising sold the homeowner the romantic English garden as a garden icon.
Advice from the Nineteenth Century Garden Catalogs:
Teach Children How to Garden
The B. N. Strong, a Connecticut seed company, discussed in its 1852 catalog how important it was to teach children how to garden: “Children are frequently led into mischief in the absence of other means of occupying themselves. How different would it be if they were taught to turn their attention to the neatness and productiveness of a garden.”
In 1859, the Bloomington Nursery in Illinois wrote in its catalog, “Thousands of our children pine for the want of nature’s health-giving luxury, fruit, without doubt the best stomach regulator the world affords. So, too, with their attachments and their sense of the beautiful in nature they dwindle for want of some of their most proper objects – homes and trees, and plants and flowers, and the exercise enjoyed in their cultivation.”
The Charles T. Starr catalog of 1882 discussed how improved society would be if more children gardened. Starr said, “Would that I could induce everyone who reads this to love and cultivate flowers, if not for their commercial value, at least for their ennobling and refining influence; for this is one of the few pleasures that improve alike the mind and the heart, and make every true lover of these beautiful creations of Infinite Love, wiser and purer and nobler. It teaches industry, patience, faith, and hope. Would that every American child could be brought up under such an atmosphere, and through life be guided by their teachings.”
Seed company owners and nurserymen, like others concerned for the moral well-being in the society, felt when children worked in the garden, they grew up to become productive citizens. Joseph Harris, from Rochester, in his 1882 catalog wrote about how to start a children’s garden: “The children each have a separate plot. They start many of the plants in boxes in the house. Make it convenient for the children. Do not ask them to make bricks without straw. Let them have all the seeds they want. If they get healthy recreation and some knowledge of vegetable growth—if they grow up to love flowers and take an interest in the garden—if they have something to think about besides dolls and dresses and dancing parties, we can well afford to let them waste a little seed and a little land. In fact, it is far from being a waste. It will pay ten times over.”
In 1885, Dreer also recommended giving children a decent plot of soil in the garden and adequate tools. He wrote, “Given rickety tools that have long been mustered out of service, a piece of ground that even sand burrs would blush to be seen upon, and the relics of last season’s purchase of seeds, what wonder is it that children regard gardening as unprofitable.
“A few simple tools well made, a plot of ground on which the sun shines and which is ordinarily fertile, seeds that will grow, and plants that are thriving, added to an occasional spurring of the little workers to the fulfilling of their task, will enable them to reap in due season an ample reward.”
-This is an excerpt from the new book America’s Romance with the English Garden (Ohio University Press).
How to Win your own copy
Book Give-away Rules: To be eligible to participate in this Book Give-away for a copy of Thomas Mickey’s book America’s Romance With the English Garden, you must comment on this guest blog entry between 8:00 a.m. (EST) Monday, June 3, and 5:00 p.m. (EST) Friday, June 7. LIMIT one entry per person. The name of the winner will be drawn from the list of those who comment. The winner will be contacted on Monday, June 10 to obtain a shipping address, and will receive a free, signed copy of the book. Open to US residents only.
Book Giveaway

I’m honored to be selected among the blogs that will be promoting fellow blogger and author Thomas Mickey’s new book titled America’s Romance with the English Garden.
The book tells the story of how late nineteenth century mass-produced garden catalogs and national garden advertising sold the homeowner the romantic English garden as a garden icon. At a time when people bought Quaker Oats, and not just oatmeal, and Ivory, not just hand soap, homeowners wanted the English garden with its signature lawn.
Here’s how the giveaway works:
To be eligible to participate in this Book Give-away for a copy of Thomas Mickey’s book America’s Romance With the English Garden, you must comment on this guest blog entry between 8:00 a.m. (EST) Monday, June 3, and 5:00 p.m. (EST) Friday, June 7. LIMIT one entry per person. The name of the winner will be drawn from the list of those who comment. The winner will be contacted on Monday, June 10 to obtain a shipping address, and will receive a free, signed copy of the book. Open to US residents only.