New Shade Garden Plants: Part 2

Yes, I know it’s bit insane when you consider how many new plants I’ve introduced at Sutherland this year. But in my defense, most were on sale, or purchased with my employee discount at the garden center. And a bit of review for the newer readers: we have spent the last several years painstakingly clearing, cleaning, and amending the property and soil so we could at long last begin the fun part– planting! The following concludes my list of shade loving plants that were incorporated into the garden this season. I hope you see something you like, or better yet, have some personal experience with any of them that you can share with me.


Hosta ‘Fire Island’

The brilliant yellow leaves of this Hosta really caught my attention earlier this spring. By summer, the leaves had turned chartreuse and the base of each leaf stained with red from the petioles. As this plant matures, it should develop rippled edges and just a touch of corrugation (already evident on some leaves). I’m a sucker for yellow and chartreuse in the shade garden.

Height: 10-14”

Spread: 15-30”

Exposure: Part shade, Full shade

Bloom time: Midsummer

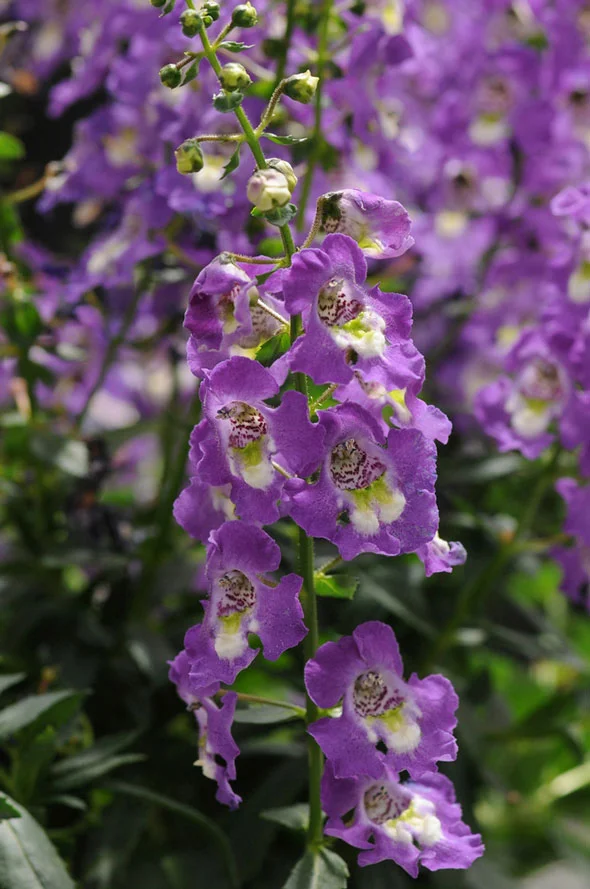
Bloom color: Lavender shades

Water: Even moisture, regular


Hosta ‘Hollywood Lights’

Whenever I see a pretty green Hosta, I snatch it up. So often, the green plants take a back seat to the blue, yellow and variegated variaties. The asymmetry of the variegation is refreshing after seeing so many “perfect” specimens at leaf shows. Each leaf is distinctive with the interplay of dark green margins and chartreuse centers.

Height: 23”

Spread: 43”

Exposure: Part shade, Full shade

Bloom time: Midsummer

Bloom color: Pale Lavender shades

Water: Even moisture, regular


Hosta ‘Hyuga Urajiro’

I can hardly pronounce the name of this little guy! It’s by far the most unusual Hosta I have in the garden. The top side of the leaves are frost blue with fine yellow streaks while the underside have a metallic silver sheen. The blooms are fantastic on arching stems– white with just a hint of pink. I’m not a fan of streaked Hostas, but I had to give this odd plant a try.

Height: 8-10”

Spread: 14-16”

Exposure: Part shade, Full shade

Bloom time: Midsummer

Bloom color: White shades

Water: Even moisture, regular


Crytomium x fortunei - Fortune’s Cold Hardy Holly Fern

Can ferns be macho? I say yes, and tend to be drawn to those that appear more masculine. Fortune’s has tough-looking woodland style with strong upright form and holly-like leaf formations. A nice departure from the more dainty ferns, which tend to resemble green doilies in the garden.

Height: 18-24”

Spread: 15-18”

Exposure: Part shade, Full shade

Bloom time: NA

Bloom color: NA

Water: Even moisture, regular


Dryopteris erythrosoia - Autumn Fern or Japanese Shield Fern

When I created my first Hosta bed, I envisioned a collection of mostly Hostas sprinkled with an occasional Hellebore and some gold grasses for contrast. As the bed grew, so did my appetite for differing plants, and dare I say color? I really like the contrasting warm tones on the new fronds of the Autumn Fern against the many shades of green, gold, and blue from the neighboring plants.

Height: 12-18”

Spread: 12-18”

Exposure: Part shade, Full shade

Bloom time: NA

Bloom color: NA

Water: Even moisture, regular


Polystichum polyblepharum - Tassel Fern 

Maybe what I really want is a fern garden!? Here’s another fern that I’ve introduced to the Hosta garden. The Tassel Fern is all about texture. It’s a sturdy fern with luscious shiny dark green fronds that bend backward after they emerge. The word “polyblepharum” means “many eyelashes.” Oh, and did I mention, deer resistant?

Height: 18-24”

Spread: 12-15”

Exposure: Part shade, Full shade

Bloom time: NA

Bloom color: NA

Water: Even moisture, regular


Euphorbia x martinii ‘Ascot Rainbow’

This was a great find! It looked terrific in the pot and has just gotten better and better since it’s been in the ground– even through the drought. The foliage and bracts are stunning in shades of cream, lime, and green. As the weather cools, the ends should become red, orange, and pink shades. Chalk this up as an excellent heat and drought tolerant plant. Technically not a ‘shade’ plant, it resides in sunny area within the shade garden.

Height: 20”

Spread: 20”

Exposure: Full Sun, Part Shade

Bloom time: Late spring

Bloom color: Multicolored

Water: Low to Average water needs


Heuchera ‘Plum Pudding’

As noted in a previous post, I’ve planted around 40 of these in one mass planting. I’m a big fan of purple/burgundy foliage plants. I find the lovely plum-purple leaves with dark purple veins on this Heuchera quite sumptuous. It blooms in white/cream shades, but I find the flowers on most Heuchera quite distracting, so I cut them off immediately after they bloom. Looking forward to a big batch of plum pudding next spring.

Height: 8-10”

Spread: 12-16”

Exposure: Full Sun, Full shade

Bloom time: Late spring to midsummer

Bloom color: White shades

Water: Average water needs


Heuchera ‘Purple Petticoats’

The photo your are looking at was not taken by me. It’s actually from the Terra Nova website, where I learned that ‘Purple Petticoats’ placed first for winter foliage at a top horticultural show during one of Holland’s toughest winters. The frilly edges of the leaves are accentuated by the clinging frost. I hope to witness this chilly effect in my own garden this coming winter.

Height: 12”

Spread: 24”

Exposure: Full Sun to Part Shade

Bloom time: Spring

Bloom color: White shades

Water: Average water needs


New Shade Garden Plants: Part 1

Working at a Garden Center and Nursery has been a blessing and a curse at the same time. It’s very difficult to resist the urge of bringing home new plants everyday. From time to time, I give into temptation and add a little something here and there at Sutherland. Looking back though, I guess it’s been more than just ‘a little’ something. Maybe I have a problem. Could I be turning into a plant collector? Could it be time for an intervention?

Before the big drought, I began with a few additions to the shade gardens. Its been difficult trying to keep it all alive during the dry period, but I think I have persevered. The following plants are new 2012 introductions at Sutherland.


Astilbe x arendsii ‘Rhythm and Blues’

This lovely perennial is set along the front of the house. I’m unsure of the finicky nature of this very thirsty plant, but when I saw the beautiful raspberry-pink plumes, I knew I had to give it a try. Much like a peony, the bloom period is fleeting, but so worth it. Astilbe is a great plant for color in the shade garden.

Height: 25”

Spread: 16-20”

Exposure: Part sun

Bloom time: Midsummer

Bloom color: Pink shades

Water: Prefers consistent soil moisture.


Thalictrum Evening Star Strain

In the Hosta garden, I’m trying this Thalicturm by Terra Nova. A grower/friend of mine gave me three of these to try and I shared two with other gardeners. I’m looking forward to next season to get a report back on their performance. This is a lovely woodland perennial with foliage like Epimedium.

Height: 8”

Spread: 10”

Exposure: Part shade, Full shade

Bloom time: Spring

Bloom color: Pink shades

Water: Average to moist


Thalictrum kiusianum, Dwarf Meadow Rue

In a different area of the Hosta bed I’ve placed a Thalictrum commonly known as Dwarf Meadow Rue. My goal for this slow spreader is to fill in all areas between the larger Hosta plants where unsightly mulch and bare spots are visible. The lacy foliage will contrast nicely against the larger leafed plants.

Height 4-6”

Spread 12-16”

Exposure: Part Shade

Bloom time: Summer

Bloom Color: Lilac shades

Water: Average to moist


Fallopia japonica ‘Variegata’, Variegated Japanese Fleeceflower 

I’m very excited about the addition of this plant as it meets several visual criteria in the garden. This is tall vigorous grower with heart-shaped creamy white leaves splashed with dark green specs. The new growth often has coral shades on reddish stems. I’ve only had the plant a few months and already I’m loving all of its attributes.

Height: 4 feet

Spread: 2-3 feet

Exposure: Full sun, Part shade

Bloom time: Late summer, Early fall

Bloom color: White shades

Water: Low to average water needs


Filipendula palmata ‘Variegata’, Meadowsweet

I find the large maple-shaped leaves along the stems of this plant enchanting. I maintain that I am a foliage guy and couldn’t resist these leaves splashed and marginated in white, platinum, lime and dark green. The leafy stems rise to 4 feet and in late spring are topped with a large plume of white flowers. This plant is best in part shade. Note: Apologies for this photo which focuses on the bloom and not the foliage. What was I thinking?

Height: 4-6 feet

Spread: 2 feet

Exposure: Part shade

Bloom time: June

Bloom color: White shades

Water: Moist, well-drained


Final thoughts: 

I’m frightened by the quantity of plants listed above and I haven’t even gotten to the Hostas, Trees, and Shrubs yet. Oh my… stay tuned.

Thalicturm Evening Star photo copyright Terra Nova Nurseries, Inc.

Girly Steel (and Style) at the Super Bowl

One woman adds her own personal touch to downtown Indianapolis streets as our city primes for its Super Bowl debut. Joanie Drizin, owner and artist of Girly Steel in Noblesville, IN, is best known for her unique steel and metal landscape sculptures. She has created a new series which features stylized footballs perched on a tall base– reminiscent of a very famous trophy. I recently interviewed Joanie to find out more about this project and her work.

How did this sculpture project come to be?

I was contacted by The Brickman Group, a landscaping company which maintains the city’s downtown planters. They reached out to me in June about the possibility of collaborating on this project whereby they would design the plantings and I would design a sculputral piece for the large-scale planters. I agreed to submit designs for consideration and that’s how the process began. I created 4 initial designs which were reviewed by a committee. The designs were enthusiastically received and I was then asked to create physical to-scale samples.

Were you given complete creative control or were there parameters set forth for the sculptures?

I wouldn’t say there were strict design parameters. I think this was a result of Brickman already being familiar with my work. The requirements were simply to A) incorporate a football, and B) the size should be 4 to 5 feet tall. A requirement was that they must fit into preexisting concrete planters. I took it from there and put pen to paper, sketching until I was satisfied with some initial designs.

Many new design variations were inspired as I was fabricating the first samples. I documented these in case there would be a need for more. Again, this phase went smoothly and now the work would need to be approved by Indianapolis Downtown Inc.

How many total sculptures did you create and how long did it take to fabricate them?

When all was said and done, I created 20 sculptures comprised of 16 originals and only 4 repeated designs. My original samples were approved by the local group that had commissioned me. I didn’t get the city’s final approval until late August. I worked diligently to complete the 20 pieces by early December. That’s about 3 months of intense cutting, bending, and welding.

Sounds like it went very smoothly.

It did for the most part. It was touch and go there for a while. You see, when you work with subject matter like this, for this particular event, the higher-ups certainly have their say. When we didn’t hear back from them right away, we wondered if the project would be cancelled. They eventually got back with us and it was full steam ahead.

What are the plans for the sculptures once game day has passed?

I’ve been told that the city will auction them off when the event is over.

Your website mentions that you have dabbled in many mediums. Tell me how you came to like metal, steel, and welding.

I have a background in commercial art. I grew up and studied in Cincinnati, OH, then moved to Broad Ripple (an Indianapolis neighborhood) as an adult. I’ve always had a strong interest in fine art and began taking classes at the Indianapolis Art Center. My main focus was pottery and I even had a full Ceramic studio in my home. However, I was very intrigued with the Metalsmithing class and decided to try it one day. I was hooked and slowly began to give myself over to it. Eventually, I sold off my Ceramics equipment and traded in my potter’s wheel for a welding helmet.

Was landscape sculpture an immediate choice, or did you work into it?

I would say it was a pretty immediate choice. I love gardening and found myself placing my sculptures outdoors in the landscape. The plant material kept inspiring me, so it was a natural fit. The gardening gene has been passed down to my son who studies plant biology and conservation at Northwestern University. He also works at the Chicago Botanic Garden.

Can you tell me about your connection to gardening and how your work fits into that?

There was always a bit of exposure to gardening in my childhood as my mother kept small backyard gardens. It wasn’t until I was an adult and on my own that I really developed as a gardener and began to apply my creativity to my own perennial beds. After I moved to Indianapolis, I had the time to devote to it and I began exploring creative expression through gardening. Though today, my time is mostly devoted to the sculptures.

One of my favorite aspects of your work is the intentional lack of coating the metal. Tell me about that symbolic gesture.

Yes! I just think the raw rusty color blends nicely with nature. I believe that nature’s own beauty is the star and my works are there to enhance it- not overtake it. The rusting metal changes and that symbolizes the passage of time.

I love how the sculptures look in winter– the rusty brown color in contrast with the snow. I deliberately incorporate geometric shapes and cutouts to catch gentle snowfalls which highlight the silhouettes.

What is the best way for people to purchase your work?

I’d love it if everyone could visit my studio in Noblesville, IN and see the actual pieces in the sculpture yard, but I realize that’s not possible, so I suggest they call or visit my website. GirlySteel.com

Do you accept commissions?

Yes. I squeeze them in from time to time– between fabrication for my general inventory.

What is inspires you?

I would say I draw the most inspiration from nature and contemporary design. It’s fair to say that I have a passion for both and the best qualities of each always find their way into my work. I strive to find a balance between the two to achieve a holistic sensibility. And let’s not forget whimsy- you gotta smile and laugh too! 

Who knows if we’ll see any snowfall on these wonderful sport-themed sculptures. Either way, visitors are bound to enjoy the work of this Indiana artist as they gather in the streets and enjoy everything we Hoosiers have to offer. Girly Steel is located in Noblesville, IN, (317) 490-1980. To see more of Girly Steel’s work, please visit the website: GirlySteel.com

In With The New!

Every year the National Garden Bureau announces many of the gardening industry’s newest varieties. The flowers below are just a sampling of what’s in store for 2012. My observation is that color is being amped up and cleaned up (less subdued hues) across the board.

The National Garden Bureau was born in 1920 and was the inspiration of James H. Burdett. He lead the charge of promoting gardening and beautification to the masses by enlisting horticultural writers and broadcasters to further education of everyday citizens and creating a population of gardeners. The Bureau came into age during World War II when the victory garden movement was in force. Today, the mission of the Bureau is the same as it was then, to improve the quality of life and the environment through increased use of seeds and plants.

There are many organizations with a similar purpose, but I look to the Bureau this time of year to get a glimpse of what to expect at nurseries and garden centers this coming season. Hopefully, some of these sensational introductions will find their way to a retail outlet near you. You may also find them in catalogs or online. For detailed plant characteristics and growing needs, visit the National Garden Bureau’s website and click on New Varieties.

​ All images courtesy of the National Garden Bureau Inc.

Raised Bed Gardening

There is something new this year in the vegetable garden– raised beds. They have long been a gardener’s favorite because they make it possible to have the best possible soil without having to fix the problems in your existing soil. This is how we made ours.

We selected a product called the M Brace for our raised beds. I fell in love with their stylish form and promise of speed and convenience. There are many prefab kits and products on the market, but DIYers can fashion raised beds out of many different materials including synthentic composites made from recycled plastic or rubber, concrete block and brick, or any naturally rot-resistant woods.

Our materials consisted of the steel M Braces, lumber, a few concrete pavers (optional), and growing media. The size of each bed measures 4 x 8 feet and 16 inches deep. Since the area for the beds was uneven, it required a bit of digging to meet the goal of levelness. I set some concrete pavers beneath the steel corners in hopes of minimizing settling. This step was not necessary, but I’m fastidious about these sorts of things. Digging was actually the hardest part of this project. From here on out, it went very fast.

Of the 10 eight-foot pieces, only 4 required cutting to make the short sides. Once the lumber was cut, it literally took no more than 5 minutes to assemble each bed. I simply slid the boards into the corners and was done. I gotta admit, I was pretty impressed by how easy it was to build the walls of each bed. Any extra soil from digging was placed in the center of each bed and eventually leveled out.

Next, the fill. It’s important to choose a good growing medium for your beds. Do not skimp here. Ordinary soil alone will become compacted and that only leads to poor aeration and water drainage. Instead, make your own growing media or purchase a premixed potting soil from a garden supply store.

We’re using Mark’s Mix from our local mulch supplier, Indiana Mulch & Stone. Mark’s Mix is composed of Mushroom Compost, Black Top Soil, Peat Moss and Hardwood Fines. Of all these ingredients, Mushroom Compost is the most beneficial. It’s a totally organic, rich, moist mixture of wheat straw, peat moss, cottonseed meal, cottonseed hulls, corncobs, cocoa bean shells, gypsum, lime, chicken litter and/or horse stable bedding. This combination of ingredients is used in commercial mushroom farms to grow mushrooms. Following mushroom production, the compost is cooked off at 160° F for 10 hours to kill undesirable pests and is usually free from weed seeds.

The mix was delivered and we went right to work filling each bed. Prior to filling, I laid a piece of semipermeable weed barrier (landscape cloth) that allows air and water to pass through. My goal is to keep the vegetable roots from reaching the original soil, hence the 16 inch depth of the beds.

With the sun setting, the beds were filled. Next steps will include planting the vegetables and mulching around the perimeter of each bed. Check back soon for a progress report. Until then… keep growing.

Benefits of Raised Bed Gardening:

Raised beds are designed so you don’t step in them, thereby reducing soil compaction. A properly designed raised bed allows you to garden from the path outside of the bed.

Raised beds can extend your planting season since they tend to warm up and dry out sooner in spring, allowing for earlier planting. They also remain productive later in the fall.

If you have limited mobility, you can make a ‘standing’ raised bed so it is more accessible. This can eliminate kneeling or bending as you garden.

Plants can be planted closer together in a raised because you don’t need places to step. This increases your productivity per square foot.

Soil conditions can be controlled more efficiently in a raised bed. They can even be varied from bed to bed.

Once the bed is constructed, soil preparation becomes minimized in future years.

Design Tips:

Beds that can be accessed from one side only should be no more than 2 feet wide. If you can reach the bed from both sides it could be up to 4 feet wide. Remember, you want to keep the soil light, loose and untrampled while you plant and weed.

Make sure the path between the beds is wide enough to access all sides.

Raised beds don’t require frames. They can be as simple as a heap of soil on the ground.

Raised beds do not have to be tall. Raising the soil just a few inches will improve water drainage.

No side support is necessary for shallow beds less than 6 inches tall. Gently slope the sides of smaller beds to prevent soil erosion from water and wind.

No saw? Have your lumber precut to your specifications before you bring it home.

Links:

Art of the Garden: creators of the M Brace | artofthegarden.net

Eartheasy: great prefab kits if you’re not handy | eartheasy.com

Indiana Mulch & Stone: downtown Indy’s mulch supplier | indianamulch.com

Children and Gardening

At age 3, our nephew Miles is learning about the importance of light and water to make things grow.

Children are fascinated by worms and insects. When left to their own devices, they enjoy digging, playing with water and making mud pies. But can this translate into an appreciation for gardening and respect for nature? I believe it can. A small Children’s Garden might just be the activity they need to make the connection.

For me, a Children’s Garden is a foreign concept since I grew up on a farm where gardening was serious business. No time for cutesy ornaments or whimsical elements to entice me. We had to “produce” and I was expected to help get the job done– no matter what my age. That’s certainly one way to approach gardening with children, but the risk is that you might end up discouraging the child instead of inspiring them.

I recently completed an extensive project for the Master Gardener Association of which I am a member. The project included designing and creating demonstrations for Cold Frames, Vegetable Gardens, a Greenhouse, a Grape Arbor and a Children’s Garden. As the 35 volunteers broke into smaller teams, I landed in the veggie garden group. Among many tasks, I would also be responsible for creating signage for each demonstration area. I was still having a hard time grasping the concept of a children’s garden and was apprehensive about that particular sign. The work began and I watched intently on the how the Children’s Garden (adjacent to the veggie garden) was taking shape. As time passed, I saw the little garden grow. With each passing phase, I began to understand the components for creating a successful area that could teach and inspire a young mind, and equally important, be fun!

The Children’s Garden created by members of the Purdue Marion County Master Gardener Association. Behind the small wheelbarrow, a platform lid can be lifted to reveal a sandbox.The sign created for visitors to the garden reads: Gardening with kids will turn digging in the dirt into a lifetime of love and respect for nature. Simple and fun-to-grow seed selections are favorites of young gardeners. Try smaller plant varieties in containers as well. 

Here are some tips for creating a Children’s Garden:

  • Keep it small so the garden isn’t overwhelming. Measuring out a yardstick garden is plenty big for very young children.
  • Give children a separate space to garden and involve them in selecting the space. This is a great teaching opportunity for you to talk about what is required for a successful garden.
  • If space is very limited, gardening in containers can be fun and just as productive. Allow your child to exercise creativity by letting them choose the containers. Just remember to have good drainage in each container.
  • Encourage enthusiasm by planting seeds that mature quickly.
  • Vegetables are a good choice and among the most popular are radishes, pumpkins, carrots, lettuces, peas, broccoli and potatoes.
  • Children are more encouraged to eat vegetables that they have grown themselves. Allow them to share in the harvest and preparation of the veggies.
  • Make tripod supports out of twigs or bamboo so climbing plants such as beans, sugar snap peas, or nasturtiums grow up into a teepee shape.
  • Add interest to the garden by adding some flowers. Be sure any flowers you plant are non-toxic.
  • Garden ornaments and decorative elements make the garden visually stimulating. Colorful windmills add movement and discourage birds and critters from making the garden their favorite lunch buffet.
  • Leave behind your ‘adult’ ideas about gardening. Perfectly straight rows are not necessary. The garden could be circular in design. You could make a pizza garden and divide the planting areas into wedge-shaped sections.
  • Keep tasks short. Make a game out of pulling weeds or set short time limits to see how many weeds can be pulled in the allotted time. Post a garden calendar in your child’s room or on the refrigerator and cross off the days when each task is completed.
  • Children should have their own tools for gardening. Be creative by using old heavy kitchen spoons for digging and measuring cups for scoops. Child-sized tools can also be purchased at most garden shops.
  • Keep the emphasis on fun and creativity. If your child would rather play in the soil or look at insects instead of pull weeds, it’s ok. They’re still learning!
  • Always seize the “teachable moment.” Don’t fight their short attention span. Explore and talk through the wonders they find.
  • Keep safety in mind. Have your soil tested prior to planting any edible garden. Resist the urge to use poisonous chemicals and sprays on a child’s garden.

Final thoughts: I can only remember one growing project I had in elementary school (4th grade). That was a long time ago… but I still remember it. As an adult, I now wonder what kind of impact we could have on our youth if they were exposed to more plant-based learning? All educators can use outdoor gardens, natural settings or plant activities in their classroom lessons to enhance a child’s education. I applaud those schools that do. Until this happens in every school, we should all do our part to work with the little ones in our lives and make the most of all the teachable moments.

Floricordially Yours – Part 2

It’s officially “psychological spring.” That’s what I call it when March rolls around. And although it is still quite cool out, the days are noticeably longer and a hint of optimism and renewal is in the air. I’m already dreaming about what to stick in all those pots that have been help up in the garage all winter.

I’m remembering that Caladiums have always made a big splash on the patio. Perhaps this will be the year I venture beyond the green and white ones, but doubtful as I am a creature of habit and there is something about that coloration in terra cotta pots that is so classic.

Caladium ‘Aaron’

Like most people, my taste has made a few swerves throughout time. I never really cared for Caladiums until a few years ago. One day they just cried out “pick me, pick me!” Convinced I’d wasted my money, weeks went by and they just looked limp and lifeless. Since that unusually cool summer, I’ve since learned that Caladiums like it hot– they’re tropical after all. That would explain why they did not proliferate the first year. In subsequent summers when the day and evening air has been warm, they were large, showy and vibrant. I typically plant them in pots alone so I can admire their foliage without any distractions, but have seen many beautiful combinations where the Caladium is the star.

A beautiful window planter in downtown Carmel features Caladiums, Begonias and Coleus.

I encourage you to venture into the world of Caladiums. These tips will help ensure success.

  • Caladiums like it hot. So don’t rush out and by them too early only to subject them to cold days and nights. This may shock them, or worse yet, cause the tuber to rot before they take off. Ultimately, you want your soil’s temperature to be at a minimum of 70°.
  • Caladiums grow best in partial shade. Full shade is also acceptable but the color may not be outstanding. Some new cultivars are able to handle a couple of hours of full sun, but they will require frequent watering.
  • The foliage is the star of the show. You may cut off the inferior flowers which just use up valuable nutrients and water that is best served for masses of leaves.
  • Pots or garden beds, the choice is yours. And color? You’ll have a choice too; pinks, reds, and greens. The leaves can be mottled, veined or striped. New cultivars are beginning to emerge in all sorts of unimaginable colors like yellow and near purple.
  • Keep the container’s soil moist but not soggy and dripping wet. Be sure your container allows for good drainage.

Pipe-hittin’ Gardener

Are garden catalogs the “crack” of avid gardeners?  I find them to be a highly addictive and powerful stimulant that deliver an intensity of pleasure beyond the bounds of normal human experience. And throw in good photography? Well, you might as well be speedballing.

But seriously, I’m pretty darn sure that it was a photograph in a White Flower Farm catalog that sent me over the edge. I used to get that catalog, or “the pusher” as I now refer to it, for many years. Then one spring, a featured Hosta collection caught my eye. That single image of the most spectacular grouping sent me into euphoria. A high like no other I had ever experienced.

I’ll never forget that summer. Racing around to every garden center like a desperate crack whore, pouring through hoop house after hoop house, trying to fulfill my plant list. Damn that catalog! They say crack cocaine is a substance that affects the brain chemistry of the user, but it’s no match for Hostas. Thus, my education into the life of an addict began. I was addicted to gardening.

From a first time user’s perspective, the garden turned out remarkably well (shown above). Three years have since passed and I still can’t escape the intense desire to recapture the initial high. Time to hit the pipe again. The Seed Savers Exchange catalog has just arrived.

P.S.  I don’t really use and I have the waistline to prove it.

The Importance of Mapping


It’s no secret. I’m fastidious about certain things. I’ve been gardening about 4 years now and from the beginning, I instinctively started documenting where and when I planted things. At first, my ‘maps’ were simple black and white drawings from hand. As the garden grew and changed, I became more and more obsessed about how I could accurately keep records of everything that was going on. It’s a work in progress, but I think I have the mapping part down.

Throughout the growing season, I make notes and draw on plain paper with a pen or pencil. Less obsessive gardeners can stop there. Since I have a graphic design background, I utilize some fancier tools to finalize the hand drawn maps. Adobe Illustrator is my program of choice because it allows me to work in layers. I can easily turn layers off and on with the click of the mouse to focus on particular aspects of the map. Sometimes I need to zero in on utility lines. Sometimes I only want to see the trees and shrubs, or maybe the hardscape only. If you’re inclined to use a computer, I suspect that any basic drawing program would do just fine. Just remember to save early and save often.

Just use circles to signify a plant on the map. I try to chart in the approximate size of full mature spread. ‘Mature Spread’ simply means how wide the plant is expected to be at full maturity. The circles will help you plan for size and quantity as you begin to plan for new additions. Other great reasons for mapping include:

Locate Individual Plants and Structures  Ever forget the name of something? Chart it on your map and you’ll always have a record of it. Chart where the gas or water line is before the backhoe digs in, etc.

Chart and Compare Growth  Keep notes in the margins or in a separate document to compare changes from year to year.

Document Color Grouping  Color in the circles can signify foliage or bloom colors. This is particularly useful for grouping by color which helps provide visual continuity.

Plan for Future Additions  Know where you have blank space and designate proper quantities. Not sure what to plant? Take your map with you to the garden center or nursery so they can fully understand your site.

Consider Space Limitations  Be familiar with mature height and spread before you plant. Draw it on the map first and see if it fits. It’s easier to move a circle around than it is a Dogwood tree.

Locate and Mark Problematic Areas  Document areas where plants don’t thrive and mark this on your map. Investigate the reasons and keep records of your amendments.

These are just a few reasons I find it useful to draw maps of the garden. If the task seems daunting and you don’t know quite where to start, here’s a tip: capture an image of your property with Google Earth and use it as a guideline. Oh, and if you ever move, be sure to leave a version with any of the plants you leave behind charted on it. I wish someone had done so for us when we moved in!

Fall Color Report

Beautiful colors and textures abound at Sutherland all year long, but fall is always the most spectacular season. Take a look at some of my favorite hues from around the property.

These Limelight Hydrangea blossoms transformed from light green to creamy white during summer. In their final stage, they are becoming more golden and parchment brown. Their texture is very papery.

Another view of the Hydrangeas with bright yellow Chrysanthemums in the foreground. The mums are also beginning to turn a bit brown around the edges.

Toward the creek, this lone Maple tree is slowly turning. Weather permitting, it will be fiery red before total leaf drop. It really stands out against the White Pines in the background.

These Sedum plants were collected from all over the property. They were moved near the creek bank a couple of years ago and are much more impressive as a single mass.

A fading Hosta with brilliant yellow and chartreuse hues. This is Hosta ‘Liberty’.

Oak Leaf Hydrangeas are a favorite around Sutherland. One of the few hydrangeas native to the United States, the leaves often turn brilliant red, orange, and burgundy in the fall. I just love the leathery texture of the leaves.

Rain has been scarce in Indianapolis so every drop is welcome. Although melancholy, the greys on this warm rainy day are soothing and serve as a reminder of what lies ahead.